CSS Layout using Float
Written By: Avinash Malhotra
Updated on
In frontend development, we can design a layout using so various css techniques. Here are some popular layout designing techniques in css.
Type of css layouts
- Table based layouts ( Outdated )
- Float based layout ( Outdated )
- CSS Flexbox (1D layout)
- CSS Grids (2D layout)
Before we had css, layouts were designed using html tables. But with the introduction of CSS, we use div tag to build float based layouts. These layouts are still in demand as they supported all browsers including IE8 and below. Div based layouts also supports responsive web designs. And now with CSS3, we can also design a layout using Flexbox or Grids.
CSS Layout Overview
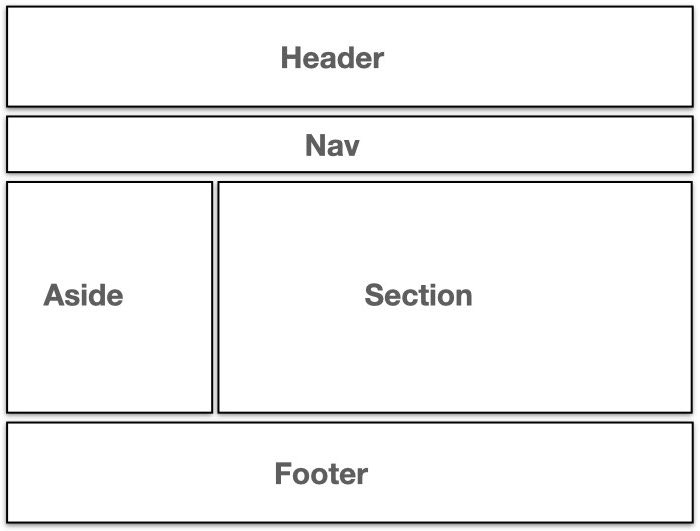
Float based layout example
Create a html page
Website design starts with html first. Create a webpage first with doctype, html tag, head, body and necessary elements. See example
<!doctype html>
<html lang="en">
<head>
<title>CSS Layout</title>
<meta charset="utf-8">
<meta name="viewport" content="width=device-width, initial-scale=1.0">
</head>
<body>
</body>
</html>
Add a Container
Create a div with container class in body. The container is a container or wrapper to group webpage header, nav, main and footer. The width of container will be 1200px and will align in center of body. We cal also use max-width: 1200px.
<!doctype html>
<html lang="en">
<head>
<title>CSS Layout</title>
<meta charset="utf-8">
<meta name="viewport" content="width=device-width, initial-scale=1.0">
</head>
<body>
    <div class="container">
        <header> header </header>
        <nav> nav </nav>
        <main> main content </main>
        <footer> footer </footer>
    </div>
</body>
</html>
Add CSS to Html
Now lets add some css to our html page. CSS can be used in external or internal form. For multiple pages website, use external css, but for single page website, can use internal css.
<!doctype html>
<html lang="en">
<head>
<title>CSS Layout</title>
<meta charset="utf-8">
<meta name="viewport" content="width=device-width, initial-scale=1.0">
<style>

*{ margin:0; box-sizing:border-box;}

body{
    font:16px/1.3 sans-serif;
}

.container{
    max-width:1200px;
    margin:auto;
}

header{
    background:#faa;
    padding:10px;
}
nav{
    background:#333;
    padding:10px;
    color:#fff;
}
main{
    background:#afa;
}
footer{
    background:#aaf;
    padding:10px;
}
</style>
</head>
<body>
    <div class="container">
        <header> header </header>
        <nav> nav </nav>
        <main> main content </main>
        <footer> footer </footer>
    </div>
</body>
</html>
Add Aside and Section in main
Now lets add some css to our html page. For left column, use div with class aside with width 25%. Now add another div with class section with width 75%.
After aside and section divs, do not forget to add a class clear to clear both.
<!doctype html>
<html lang="en">
<head>
<title>CSS Layout</title>
<meta charset="utf-8">
<style>

*{ margin:0; box-sizing:border-box;}

body{
    font:16px/1.3 sans-serif;
}

.container{
    max-width:1200px;
    margin:auto;
}

header{
    background:#faa;
    padding:10px;
}
nav{
    background:#333;
    padding:10px;
    color:#fff;
}
main{
    background:#afa;
}
aside{
    width: 25%;
    float:left;
    padding:10px;
    background:#afa;
}
section{
    width: 75%;
    float:left;
    padding:10px;
    background:#ccc;
}
.clear{
    clear:both;
}
footer{
    background:#aaf;
    padding:10px;
}
</style>
</head>
<body>
    <div class="container">
        <header> header </header>
        <nav> nav </nav>
        <main>
            <aside>aside</aside>
            <section>section</section>
            <div class="clear" role="presentational"></div>
        </main>
        <footer> footer </footer>
    </div>
</body>
</html>
Add navigation menu in nav
Now lets create a navigation menu. Create a UL ( unordered list) with five li elements and a hyperlink in each li.
<!doctype html>
<html lang="en">
<head>
<title>CSS Layout</title>
<meta charset="utf-8">
<meta name="viewport" content="width=device-width, initial-scale=1.0">
<style>

*{ margin:0; box-sizing:border-box;}

body{
    font:16px/1.3 sans-serif;
}

.container{
    max-width:1200px;
    margin:auto;
}

header{
    background:#faa;
    padding:10px;
}
nav{
    background:#333;
    padding:10px;
    color:#fff;
}
nav ul{
    list-style:none;
    padding:0;
}
nav ul li{
    float:left;
    margin-right:10px;
}
nav ul li a{
    text-decoration:none;
    color:inherit;
    display:block;
    padding:8px 12px;
}
main{
    background:#afa;
}
aside{
    width: 25%;
    float:left;
    padding:10px;
    background:#afa;
}
section{
    width: 75%;
    float:left;
    padding:10px;
    background:#ccc;
}
.clear{
    clear:both;
}
footer{
    background:#aaf;
    padding:10px;
}
</style>
</head>
<body>
    <div class="container">
        <header"> header </header>
        <nav>
            <ul>
                <li><a href="">Home</a></li>
                <li><a href="">About</a></li>
                <li><a href="">Career</a></li>
                <li><a href="">Archives</a></li>
                <li><a href="">Contact</a></li>
            </ul>
            <div class="clear" role="presentation"></div>
        </nav>
        <main>
            <aside>aside</aside>
            <section>section</section>
            <div class="clear" role="presentation"></div>
        </main>
        <footer"> footer </footer>
    </div>
</body>
</html>
Test Layout using validation
We have to follow W3C web standards while coding. Try to test your final layout on w3c validator. To do this, follow steps below.
W3C Validation test
- Open w3c validator.
- Click second tab, i.e, Validate by File Upload.
- Upload your file from system.
- Press Check button to validate.
- Check errors and warning in red and yellow backgrounds.