Upload image in MVC using Model
Written By:- Isha MalhotraIntroduction
As we know image uploading is very common task to do. In this article I am explaining how to upload image in mvc using Model. In my next article I will explain how to upload image without model.
First of all I am creating the following table to store employee details:-
create table employee(empid int primary key identity(1,1), name varchar(100), user_image varchar(500))
Now add MVC project and create model class for this table and mapped it with table.DevTool. Developers Tool is a Debugging Tool in Chrome which provides accessibility of Web Application in Detail.
Note: - I am using LINQ to SQL to upload image. If you are not aware about LINQ to SQL, kindly go through it first.
		using System;
using System.Collections.Generic;
using System.Linq;
using System.Web;
using System.Data.Linq.Mapping;

namespace MvcApplication1.Models
{
    [Table]
    public class Employee
    {
        [Column(IsPrimaryKey=true, IsDbGenerated=true)]
        public int empid { get; set; }
        [Column]
        public string name { get; set; }
        [Column]
        public string user_image { get; set; }

        //It provide access to individual files that have been uploaded by a client.
        public HttpPostedFileBase user_image_data { get; set; }
    }
}
Now add controller. I have added home controller and insert action. Now add view by right clicking on insert action
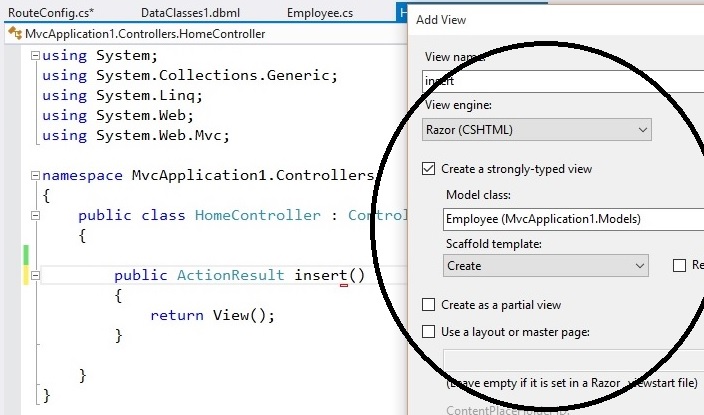 Figure 1
I have selected strongly type view with scaffold option create to add view.
Code of View
		@model MvcApplication1.Models.Employee

@{
    Layout = null;
}

<!DOCTYPE html>

<html>
<head>
    <meta name="viewport" content="width=device-width" />
    <title>insert</title>
</head>
<body>
    @using (Html.BeginForm("insert", "home", FormMethod.Post, new { enctype = "multipart/form-data" }))
    {
        @Html.ValidationSummary(true)

        <fieldset>
            <legend>Employee</legend>

            <div class="editor-label">
                @Html.LabelFor(model => model.name)
            </div>
            <div class="editor-field">
                @Html.EditorFor(model => model.name)
                @Html.ValidationMessageFor(model => model.name)
            </div>

            <div class="editor-label">
               @Html.Label("Upload your image")
            </div>


            <div class="editor-field">
                @Html.TextBoxFor(model => model.user_image_data, new { Type = "File" })
                @Html.ValidationMessageFor(model => model.user_image_data)
            </div>

            <p>
                <input type="submit" value="Create" />
            </p>
        </fieldset>
    }


</body>
</html>
Now create folder to store image. I have added folder and give it name as image
 Figure 2
Now create posted method to submit data.
		using System;
using System.Collections.Generic;
using System.Linq;
using System.Web;
using System.Web.Mvc;
using MvcApplication1.Models;
using System.Data.Linq;

namespace MvcApplication1.Controllers
{
    public class HomeController : Controller
    {
        DataContext dc = new DataContext("your database connection string");

        public ActionResult insert()
        {
            return View();
        }
        [HttpPost]
        public ActionResult insert(Employee emp)
        {
            //create path to store in database
           emp.user_image = "~/image/" + emp.user_image_data.FileName;

            //store image in folder
          emp.user_image_data.SaveAs(Server.MapPath("image") + "/" + emp.user_image_data.FileName);

            //insert in database
          dc.GetTable<Employee>().InsertOnSubmit(emp);
          dc.SubmitChanges();

            return View();
        }
    }
}
Now execute this code
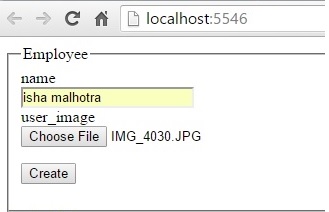 Figure 3
After submitting the page go to the project folder where you have uploaded image and can check it.
Email Address
For any query you can mail me at info@techaltum.com