Area in MVC
Written By:- Isha MalhotraWhat is Area
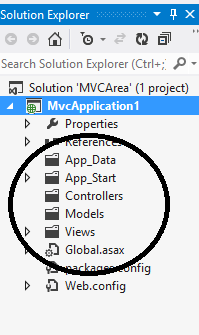
In MVC we all are familiar with the folder of Model, View and Controller which added at the time of MVC project Creation.
 Figure 1
This approach is best for small project which do not contain much module but when we talk about large application which having so many modules in that situation we want to separate the logic module wise.
Area is the solution. We can split a large project into smaller unit by using area. Area introduced in MVC 2. It is basically logical grouping of project which create separate Model, View and controller folder for each group or module.
Area Example
For example I am having an application of online shopping management where we have following modules:-
Stock Module, Billing Module, User Module and Admin Module.
So we want to create separate Area for each module.
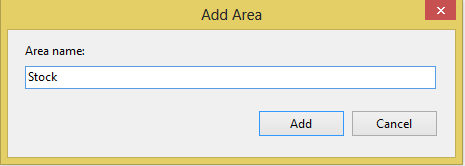
To add Area right click on your application->Add->Area
 Figure 2
Give a proper name to Area according to module.
 Figure 3
Click on add button and an Area will be added in your project.
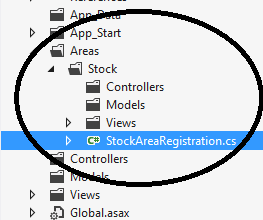
 Figure 4
You can see that a folder named Area Added in your project in which another folder named with your module Stock added. For each area it added controllers, models and View folder.
Similarly add another area for other modules by right clicking on Area folder.
 Figure 5
Now you can see that we have area for each module and we have Controllers, Models and Views folder for main Application.
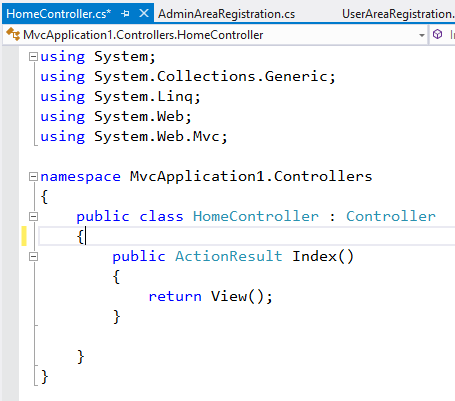
Now add controller to Main Project and give it a name Home.
 Figure 6
 Figure 7
Now add home controller for each area
 Figure 8
Similarly add Home controller for each Area. Now add view for each controller action named Index.
Now execute the code and you will get following error:-
 Figure 9
To resolve this issue we have to open Route config file from App_Start folder. Here you will find the default route where controller name and action already set.
Add Namespace of the Main Controller which you want to run as default.
		public class RouteConfig
    {
        public static void RegisterRoutes(RouteCollection routes)
        {
            routes.IgnoreRoute("{resource}.axd/{*pathInfo}");

            routes.MapRoute(
                name: "Default",
                url: "{controller}/{action}/{id}",
                defaults: new { controller = "Home", action = "Index", id = UrlParameter.Optional },
                namespaces: new[] { "MvcApplication1.Controllers" }
            );
        }
    }
Now again execute the code
 Figure 10
When you see your solution explorer you will find Area Registration file for each area. In this cs file we can configure route for each area. If you open this file you will find that in your route default controller is not set. First of all set your default controller which is Home according to my example. So register it. It will help you to open each area controller and action directly from your url.
		public override void RegisterArea(AreaRegistrationContext context)
        {
            context.MapRoute(
                "Admin_default",
                "Admin/{controller}/{action}/{id}",
                new { Controller="Home", action = "Index", id = UrlParameter.Optional }
            );
        }
Now go to main controller view’s action which is index and create link to access each area’s home controller’s action which is index.
		@{
    Layout = null;
}

<!DOCTYPE html>

<html>
<head>
    <meta name="viewport" content="width=device-width" />
    <title>Index</title>
</head>
<body>
    <div>

        Hello!! This is Main Home Controller View.

        <br />
        <div style="text-align:center">
       @Html.ActionLink("Home","Index","Home", new {area=""},null) |
       @Html.ActionLink("Stock","Index","Home", new {area="Stock"},null)|
       @Html.ActionLink("User","Index","Home", new {area="User"},null)|
       @Html.ActionLink("User","Index","Home", new {area="Admin"},null)

            </div>
    </div>
</body>
</html>
We have to add area name with actionlink which represent that which area view we are going to call.
Now execute the code
 Figure 11
Now click on link and you will redirect to their corresponding view.
NOTE: - sometimes you will get following error while running this code:-
 Figure 12
Email Address
For any query you can mail me at Malhotra.isha3388@gmail.com.