Scaffolding Create Option using LINQ in MVC
Written By:- Isha MalhotraMVC Scaffolding List Option
In my last article I described how to create List using Scaffolding . In this article I will discuss how to use Scaffolding Create option. If you have seen the output of LIST example code then you can see that there is link on the page for Create New.
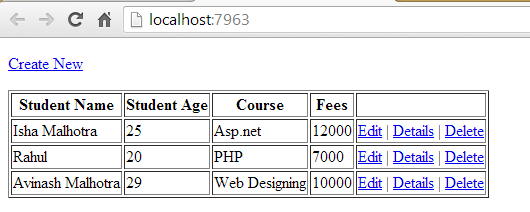 Figure 1
If we click on this link we simply get the error as it’s looking for Home controller and Create action
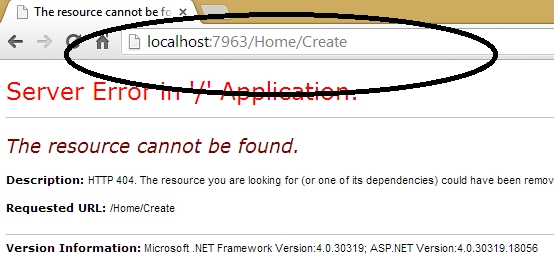 Figure 2
So first I have to create the action for Create and then add View for this Create action
		public ActionResult Create()
        {

            return View();

        }
Now right click on Create and Add view and select Model from the list and choose Create in Scaffolding option:-
 Figure 3
As you click on Add button a new View will be added. Now again execute the code and select Create New
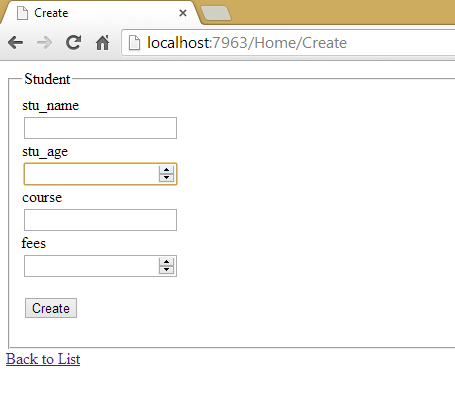 Figure 4
As you can see that scaffolding option automatically added page for insertion data for Student Table. We can also customize this page and change controls according to our need. For example for course I want to show the dropdownlist and for stu_age and fees I want to show the textbox and also want to change the message which is displaying. So we can also customize this page and after customization the code will be as follows:-
Create.cshtml
		@model MvcApplication1.Models.Student

@{
    Layout = null;
}

<!DOCTYPE html>

<html>
<head>
    <meta name="viewport" content="width=device-width" />
    <title>Create</title>
</head>
<body>
    @using (Html.BeginForm()) {
        @Html.ValidationSummary(true)

        <fieldset>
            <legend>Student</legend>

            <div class="editor-label">
                @Html.Label("Student Name")
            </div>
            <div class="editor-field">
                @Html.EditorFor(model => model.stu_name)
                @Html.ValidationMessageFor(model => model.stu_name)
            </div>

            <div class="editor-label">
                @Html.Label("Student Age")
            </div>
            <div class="editor-field">
                @Html.TextBoxFor(model => model.stu_age)
                @Html.ValidationMessageFor(model => model.stu_age)
            </div>

            <div class="editor-label">
                @Html.Label("Course")
            </div>
            <div class="editor-field">
                @Html.DropDownListFor(model => model.course, new List<SelectListItem>()
           {

               new SelectListItem(){Text="Asp.net", Value="Asp.net"},
               new SelectListItem(){Text="PHP", Value="PHP"},
               new SelectListItem(){Text="Java", Value="Java"}
           }
                )
                @Html.ValidationMessageFor(model => model.course)
            </div>

            <div class="editor-label">
                @Html.Label("Fees")
            </div>
            <div class="editor-field">
                @Html.TextBoxFor(model => model.fees)
                @Html.ValidationMessageFor(model => model.fees)
            </div>

            <p>
                <input type="submit" value="Create" />
            </p>
        </fieldset>
    }

    <div>
        @Html.ActionLink("Back to List", "Index")
    </div>
</body>
</html>
Now execute this code and you will get following output window:-
 Figure 5
Now add one more action with same name Create and take object of type Student which is our model.
In my last article series I explained how we can fetch value using Model. If you are not aware about that method then Click Here
To differentiate the method I assign [HttpGet] attribute on the action which invoked on the Create New link and assign [HttpPost] attribute on the action which will be invoked at the time of form submission.
HomeController.cs
Now the code of Home controller will be as follows:-
		using System;
using System.Collections.Generic;
using System.Linq;
using System.Web;
using System.Web.Mvc;
using System.Data.Linq;
using System.Configuration;

namespace MvcApplication1.Controllers
{
    public class HomeController : Controller
    {
        //add connection string in web Config file
        DataContext dc = new DataContext(ConfigurationManager.ConnectionStrings["con_string"].ToString());

        public ActionResult Index()
        {
            // it is linq method which return complete list of this table
            IEnumerable<MvcApplication1.Models.Student> stu_data = dc.GetTable<MvcApplication1.Models.Student>();


            return View(stu_data);
        }

        [HttpGet]
        public ActionResult Create()
        {

            return View();

        }

        [HttpPost]
        public ActionResult Create(MvcApplication1.Models.Student stu)
        {
           //this method is used to insert data in database using LINQ
            dc.GetTable<MvcApplication1.Models.Student>().InsertOnSubmit(stu);
            dc.SubmitChanges();
            return View();

        }

    }
}
Now execute this code and fill the form and click on create button
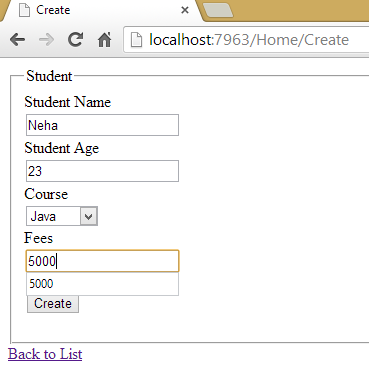 Figure 6
Now click on Back to List and you will find your data added in the database
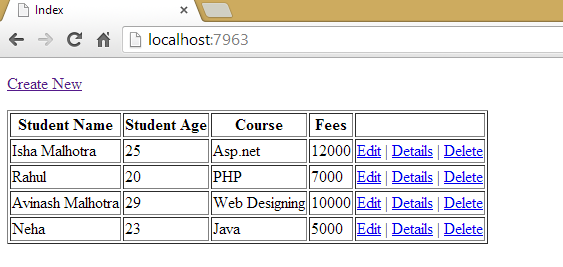 Figure 7
Hope you enjoyed the article. In my next article I will explain how to perform Edit using scaffolding