Scaffolding using LINQ in MVC
Written By:- Isha MalhotraWhat is Scaffolding
Scaffolding is the option in MVC which provide the facility to generate automatic code page for certain functionality like List, insert, update, delete etc. It is the major tool which provides quick way to generate code.
In this example I am using LINQ to generate back end part. In my next article series I will show the same example using Entity Framework.
If you are new to LINQ then kindly first Click Here then study this article. I am using following table to generate scaffolding option:-
Table Name:-Student Schema:- Structure:-
		create table student(stu_id int primary key identity(1,1), stu_name varchar(100),
		stu_age int, course varchar(100), fees int)
 Figure 1
Now go to the visual studio->File->New->Project->select Web from the left panal->Mvc4 Select the empty project Now add the LINQ to SQL Classes. Right click on the application->Add->New Item
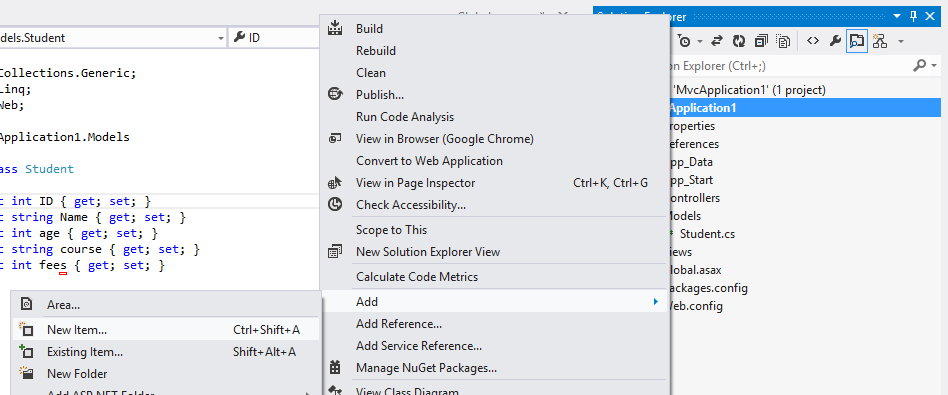 Figure 2
Then select data from left panel then select LINQ to SQL Classes. Note: - if you are new to LINQ to SQL then kindly first click here
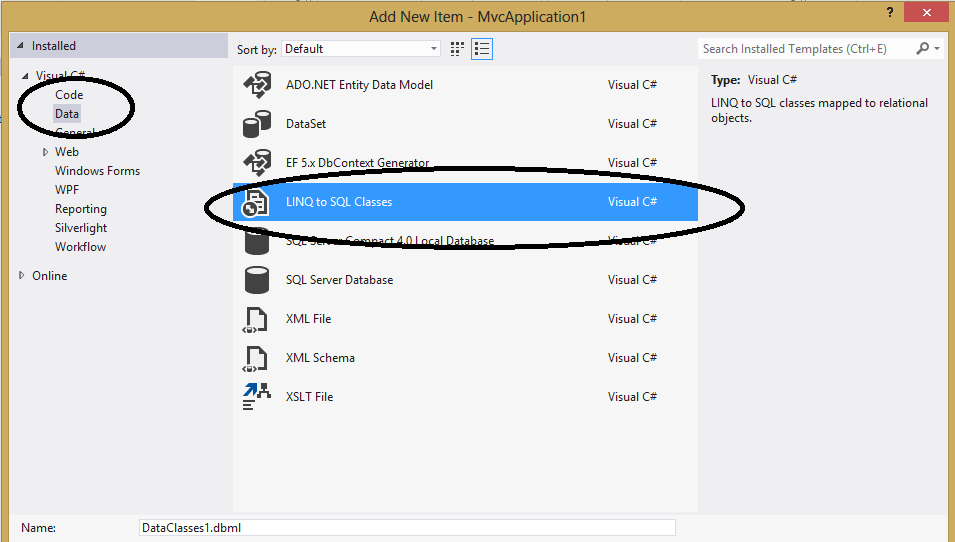 Figure 3
Now go to the model folder. Right click on this folder and add class in which we create properties for student table and map it with database. If you are not aware about the model then kindly first click here.
Student.cs
using System;
using System.Collections.Generic;
using System.Linq;
using System.Web;
using System.Data.Linq;
using System.Data.Linq.Mapping;

namespace MvcApplication1.Models
{
   [Table(Name="Student")]
    public class Student
    {
       [Column(IsPrimaryKey=true,IsDbGenerated=true)]
       public int stu_id { get; set; }
       [Column]
       public string stu_name { get; set; }
        [Column]
       public int stu_age { get; set; }
        [Column]
       public string course { get; set; }
        [Column]
       public int fees { get; set; }
    }
}
Now add controller for this MVC application. Go to the controller folder and right click on it
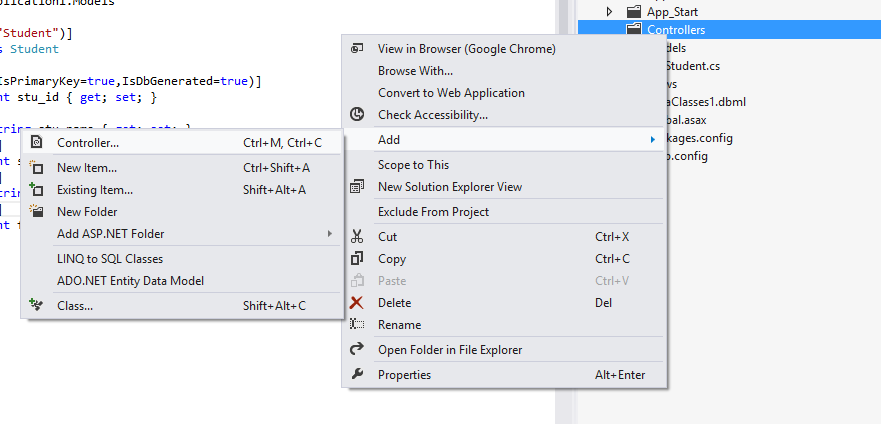 Figure 4
Then give a name to the controller and add it.
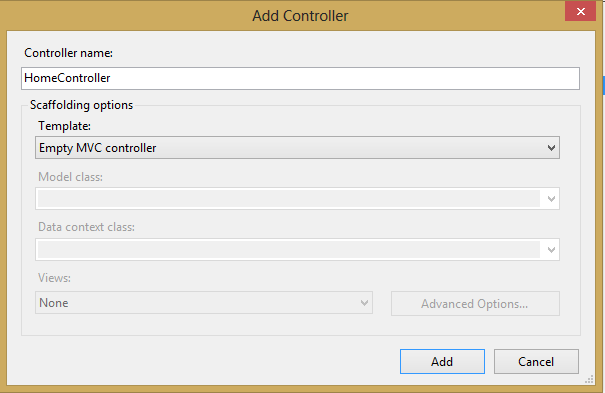 Figure 5
Now add view for the Index action. Create a strongly type view in which select student class as model. As you select the model class you will see that scaffolding dropdown list has been activated. Select list from this dropdown list and click on add button.
 Figure 6
<
		Figure 6
				<
As you added the view you will see a complete the index view with coding has been added according to the model. You will get following code:-
Index.cshtml
		@model IEnumerable<MvcApplication1.Models.Student>

@{
    Layout = null;
}

<!DOCTYPE html>

<html>
<head>
    <meta name="viewport" content="width=device-width" />
    <title>Index</title>
</head>
<body>
    <p>
        @Html.ActionLink("Create New", "Create")
    </p>
    <table>
        <tr>
            <th>
                @Html.DisplayNameFor(model => model.stu_name)
            </th>
            <th>
                @Html.DisplayNameFor(model => model.stu_age)
            </th>
            <th>
                @Html.DisplayNameFor(model => model.course)
            </th>
            <th>
                @Html.DisplayNameFor(model => model.fees)
            </th>
            <th></th>
        </tr>

    @foreach (var item in Model) {
        <tr>
            <td>
                @Html.DisplayFor(modelItem => item.stu_name)
            </td>
            <td>
                @Html.DisplayFor(modelItem => item.stu_age)
            </td>
            <td>
                @Html.DisplayFor(modelItem => item.course)
            </td>
            <td>
                @Html.DisplayFor(modelItem => item.fees)
            </td>
            <td>
                @Html.ActionLink("Edit", "Edit", new { id=item.stu_id }) |
                @Html.ActionLink("Details", "Details", new { id=item.stu_id }) |
                @Html.ActionLink("Delete", "Delete", new { id=item.stu_id })
            </td>
        </tr>
    }

    </table>
</body>
</html>
As you can see that scaffolding created complete list page for this model. It added table with header and loop which is showing the data. Similarly it also added actionlink in which it bound the student id which is primary key for our code.
On the top you can see that it is taking IEnumerable of type student which we will pass from the Index action.
Now go to the controller and create the object of DataContext class and in index method call the data of student table. And pass this data to the view.
Home Controller
		using System;
using System.Collections.Generic;
using System.Linq;
using System.Web;
using System.Web.Mvc;
using System.Data.Linq;
using System.Configuration;

namespace MvcApplication1.Controllers
{
    public class HomeController : Controller
    {
        //add connection string in web Config file
        DataContext dc = new DataContext(ConfigurationManager.ConnectionStrings["con_string"].ToString());

        public ActionResult Index()
        {
            // it is linq method which return complete list of this table
            IEnumerable<MvcApplication1.Models.Student> stu_data = dc.GetTable<MvcApplication1.Models.Student>();


            return View(stu_data);
        }

    }
}
Now execute this code and you will get following output:-
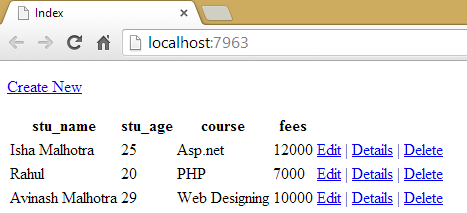 Figure 7
If you want to customize this view page then we can also customize this page. For example I want to show lines to this table and change the column name which it’s showing then we can also customize this page.
So I simply assign border to the table and use label to show custom column.
Code after Customization
		@model IEnumerable<MvcApplication1.Models.Student>

@{
    Layout = null;
}

<!DOCTYPE html>

<html>
<head>
    <meta name="viewport" content="width=device-width" />
    <title>Index</title>
</head>
<body>
    <p>
        @Html.ActionLink("Create New", "Create")
    </p>
    <table border="1">
        <tr>
            <th>
                @Html.Label("Student Name")
            </th>
            <th>
                @Html.Label("Student Age")
            </th>
            <th>
                @Html.Label("Course")
            </th>
            <th>
                @Html.Label("Fees")
            </th>
            <th></th>
        </tr>

    @foreach (var item in Model) {
        <tr>
            <td>
                @Html.DisplayFor(modelItem => item.stu_name)
            </td>
            <td>
                @Html.DisplayFor(modelItem => item.stu_age)
            </td>
            <td>
                @Html.DisplayFor(modelItem => item.course)
            </td>
            <td>
                @Html.DisplayFor(modelItem => item.fees)
            </td>
            <td>
                @Html.ActionLink("Edit", "Edit", new { id=item.stu_id }) |
                @Html.ActionLink("Details", "Details", new { id=item.stu_id }) |
                @Html.ActionLink("Delete", "Delete", new { id=item.stu_id })
            </td>
        </tr>
    }

    </table>
</body>
</html>
Now execute this code and you will find the following output:-
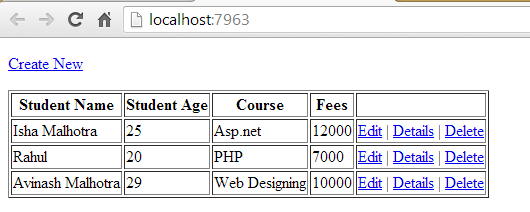 Figure 8
Email Address
For any query you can mail me at Malhotra.isha3388@gmail.com.