Introduction
In previous article I discussed about the HTML Helper class and we created some control using this class. In this article I am continuing this topic and will discuss about the others controls and continue with the previous example which I used in my last article.
Methods in HTML Helper Classes:-
RadioButton
This HTML Helper method is used to create Radio Button. This method returns radio button input element. In this method we pass id and name to the radio button method as a first parameter. In second value we pass the value which will be accessed when form submitted.
Syntax of Radio Button:-
@Html.RadioButton("rgender","Male")
In this example rgender is id and name for this control and Male is the value which accessed on form submitted.
If you want to by default select any value then you can also pass third parameter as true which represent the value as selected.
For example:-
@Html.RadioButton("rgender","Male",true)
Password
This HTML Helper method is used to create TextBox having password type. In this method we pass the id and name to this control.
For example:-
@Html.Password("pass")
In this example pass is id and name in this example.
TextArea
This HTML Helper method is used to create multiline Textbox.
In this method we pass id and name.
Syntax of TextArea
@Html.TextArea("intro")
In this example intro is id and name for this control.
Complete Example using these controls
Following is the example using these controls which I discussed in this article.
Create home controller and action index. In this view I have created two textbox and submit button using html helper classes.
Following is the example in which I am using all control and fetching their value into another view
Create home controller and index view
	@{
    Layout = null;

}

<!DOCTYPE html>

<html>
<head>
    <meta name="viewport" content="width=device-width" />
    <title>Index</title>
</head>
<body>

    @using (Html.BeginForm("hello", "Home", FormMethod.Post))
    {

        <table>
            <tr>
                <td>@Html.Label("Enter your First name")</td>
                <td>@Html.TextBox("fname")</td>
            </tr>
            <tr>
                <td>@Html.Label("Enter your Last name")</td>
                <td>@Html.TextBox("lname")</td>
            </tr>
            <tr>
                <td>@Html.Label("Gender")
                </td>
                <td>
                    @Html.RadioButton("rgender", "Male", true)<span>Male</span>
                    @Html.RadioButton("rgender", "Female")<span>Female</span>
                </td>

            </tr>
            <tr>
                <td>@Html.Label("Enter your Password")</td>
                <td>@Html.Password("pass")</td>

            </tr>
            <tr>
                <td>@Html.Label("Re-Enter your Password")</td>
                <td>@Html.Password("pass")</td>

            </tr>
            <tr>
                <td>@Html.Label("Brief Introduction about yourself")</td>
                <td>@Html.TextArea("intro")</td>
            </tr>

            <tr>
                <td></td>
                <td>@Html.TextBox("sub_button", "Full Name", new { type = "submit" })


                </td>
            </tr>

        </table>


    }


</body>
</html>
Now create another view name hello and in this method pass control value as parameter and either store it in database or print it. I am just printing this value on screen.
		using System;
using System.Collections.Generic;
using System.Linq;
using System.Web;
using System.Web.Mvc;

namespace MvcApplication6.Controllers
{
    public class HomeController : Controller
    {

        public ActionResult Index()
        {

            return View();
        }

        public ActionResult hello(string fname, string lname, string rgender, string pass, string intro)
        {
            Response.Write("Hello "+fname + " " + lname+"
 Your Gender is "+rgender+"
 Your Password is "+pass+"
 Your Brief Introduction is "+intro);


            return View();

        }
    }
}
Output of this code as follows:-
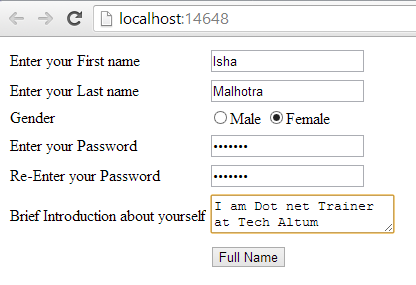 Figure 1
After click on submit button
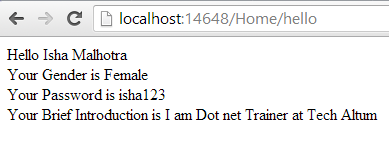 Figure 2
In next article I will discuss the others controls using html helper.
Email Address
For any query you can mail me at info@techaltum.com